记载点滴


  • Home

  • Archives

Linux 802.11n CSI Tool

Posted on 2019-10-21


英文参考

Linux 802.11n CSI Tool


笔记

【1】list station mac address

1
2
$ sudo ls /sys/kernel/debug/ieee80211/phy0/netdev:wlan0/stations/
00:0f:34:9d:01:a0

【2】Parsing the CSI trace file

1
$ cd linux-80211n-csitool-supplementary/matlab

In MATLAB or Octave

// use the sample_data or use the generated data 
csi_trace = read_bf_file('sample_data/log.all_csi.6.7.6');

matlab实现傅里叶变换

Posted on 2019-10-20

本文目录

  • CSI数据说明

  • matlab实现简单变换


    本文参考

    Linux 802.11n CSI Tool

    小波变换 完美通俗解读

    小波变换基础

    傅立叶分析和小波分析之间的关系

    从傅里叶变换进阶到小波变换(一)

    从傅里叶变换进阶到小波变换(二)


笔记

【1】list station mac address

1
2
$ sudo ls /sys/kernel/debug/ieee80211/phy0/netdev:wlan0/stations/
00:0f:34:9d:01:a0

【2】Parsing the CSI trace file

1
$ cd linux-80211n-csitool-supplementary/matlab

In MATLAB or Octave

1
2
3
4
5
6
7
8
9
10
11
12
13
14
15
16
17
18
19
20
21
// use the sample_data or use the generated data 
csi_trace = read_bf_file('sample_data/log.all_csi.6.7.6');
```

```angular2
csi_entry = csi_trace{1} (Note the curly-braces {}, not parentheses ().)

csi_entry =

timestamp_low: 4 (In the sample trace, timestamp_low is invalid and always 4.)
bfee_count: 72
Nrx: 3
Ntx: 1
rssi_a: 33
rssi_b: 37
rssi_c: 41
noise: -127
agc: 38
perm: [3 2 1]
rate: 256
csi: [1x3x30 double]
  • bfee_count:a count of the total number of beamforming measurements that have been recorded by the driver and sent to the space

  • Nrx:represents the number of antennas used to receive the packet by this NIC

  • Ntx:represents the number of space/time streams transmitted

  • prem:The sample value of [3 2 1] implies that Antenna C was sent to RF Chain A, Antenna B to Chain B, and Antenna A to Chain C

  • csi:It is a Ntx x Nrx x 30 3-D matrix where the third dimension is across 30 subcarriers in the OFDM channel

    1
    >> csi = get_scaled_csi(csi_entry);     // we use the script get_scaled_cis.m to do this

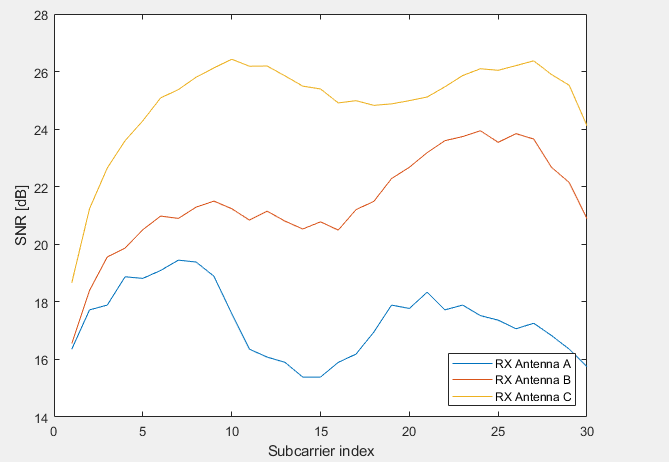
Let’s look at the three different spatial paths on the 1x3 link we measured
(Running the code with the Nrx is not 3 and the Ntx is not 1,there is a problem;i use the squeeze() turns csi
in to a 3x30 matrix,but at first,the matrix is 1x3x30,we should turn the matrix shape)

The complete block of code is shown below.

1
2
3
4
5
6
7
csi_trace = read_bf_file('sample_data/log.all_csi.6.7.6');
csi_entry = csi_trace{1};
csi = get_scaled_csi(csi_entry);
plot(db(abs(squeeze(csi).')));
legend('RX Antenna A', 'RX Antenna B', 'RX Antenna C', 'Location', 'SouthEast' );
xlabel('Subcarrier index');
ylabel('SNR [dB]');

The result is shown below

avater

for the matrix shape is 3x3x30,i try to change the shape of the matrix into 1x3x30,so i can run the code correctly


The complete block of code is shown below.

1
2
3
4
5
6
7
8
9
csi_trace = read_bf_file('subcarrier_1snd.dat');
csi_entry = csi_trace{1}; % the matrix shape is 2x3x30
csi = get_scaled_csi(csi_entry);
csi = csi(1,:,:);
subplot(1,2,1);
plot(db(abs(squeeze(csi).')));
legend('RX Antenna A', 'RX Antenna B', 'RX Antenna C', 'Location', 'SouthEast' );
xlabel('Subcarrier index');
ylabel('SNR [dB]');

The result is shown below
avater

notice: The above data can be obtain from the Internet;In netx chapter,i will use the data that is got from the NIC


before we realize ft,we must know some knowledge.

分辨率、帧速率、码流、采样位深、采样率、比特率

傅里叶变换

用Matlab进行快速傅里叶变换

1
2
3
4
5
6
7
8
9
10
clear           % 清空变量区
Fs = 128; % 采样频率
T = 1/Fs; % 采样时间
L = 256; % 信号长度
t = (0:L-1)*T; % 将范围0-L,乘以T
x = 5 + 7*cos(2*pi*15*t - 30*pi/180) + 3*cos(2*pi*40*t - 90*pi/180); %cos为底原始信号
% 频率15HZ和频率40Hz
y = x + randn(size(t)); %添加噪声
figure
plot(t,y)


avatar

1
2
3
4
5
6
7
8
9
10
11
12
13
14
15
16
17
18
19
20
21
22
23
24
25
26
27
28
29
30
31
32
% 在上面的基础上
N = 2^nextpow2(L); %采样点数,采样点数越大,分辨的频率越精确,N>=L,超出的部分信号补为0
% nextpow2(L),返回一个数n,即2的n次方最接近于L

Y = fft(y,N)/N*2; %除以N乘以2才是真实幅值,N越大,幅值精度越高
% 参考其他文章 https://blog.csdn.net/jasondooc/article/details/50202389

f = Fs/N*(0:1:N-1); %频率

A = abs(Y); %幅值,如a+bi,幅值 = sqrt(a*a+b*b)

P = angle(Y); %相值

figure;

subplot(211);

plot(f(1:N/2),A(1:N/2)); %函数fft返回值的数据结构具有对称性,因此我们只取前一半

title('幅值频谱');

xlabel('频率(Hz)');

ylabel('幅值');

subplot(212);plot(f(1:N/2),P(1:N/2));

title('相位谱频');

xlabel('频率(Hz)');

ylabel('相位');

avatar


(第一阶段)关于CSI工具的安装与数据读取

Posted on 2019-10-17

支持的内核版本:3.2 - 4.2

ubuntu对应版本:例如ubuntu 12.04,ubuntu 14.04.4

(这里,一开始我下载的是14.04.6,但是内核版本是4.4的;以下操作是基于12.04发行版的)

支持的设备:intel 5300

新版本官方教程

ubutnu 下载链接


一、安装过程

这里,笔者主要参考CSI Tools的安装


1
2
3
4
5
6
7
8
9
10
11
12
13
14
15
16
17
18
19
20
21
22
23
24
25
26
27
28
29
30
31
32
33
34
35
36
37
38
39
40
41
42
43
1. Prerequisites
sudo apt-get install gcc make linux-headers-$(uname -r) git-core
2. Build and Install the Modified Wireless Driver

CSITOOL_KERNEL_TAG=csitool-$(uname -r | cut -d . -f 1-2)

git clone https://github.com/dhalperi/linux-80211n-csitool.git
# clone慢的话,这里给出百度网盘的链接
cd linux-80211n-csitool

git checkout ${CSITOOL_KERNEL_TAG}
#之前这一步会报错,之后查看就是系统内核版本过高引起的
# 一开始clone慢,去github直接下载,但是缺少分支报错;
# error:pathspec 'csitool-3.13' did not match any files know to git

make -C /lib/modules/$(uname -r)/build M=$(pwd)/drivers/net/wireless/iwlwifi modules

sudo make -C /lib/modules/$(uname -r)/build M=$(pwd)/drivers/net/wireless/iwlwifi INSTALL_MOD_DIR=updates modules_install

sudo depmod

cd ..

3. Install the Modified Firmware

git clone https://github.com/dhalperi/linux-80211n-csitool-supplementary.git

for file in /lib/firmware/iwlwifi-5000-*.ucode; do sudo mv $file $file.orig; done

sudo cp linux-80211n-csitool-supplementary/firmware/iwlwifi-5000-2.ucode.sigcomm2010 /lib/firmware/

sudo ln -s iwlwifi-5000-2.ucode.sigcomm2010 /lib/firmware/iwlwifi-5000-2.ucode

4. Build the Userspace Logging Tool

make -C linux-80211n-csitool-supplementary/netlink

5. Enable Logging and Test
sudo modprobe -r iwlwifi mac80211 # unload the driver
# 如果出现FATAL:Module iwlwifi is in use.
# 执行 sudo modprobe -r iwldvm iwlwifi mac80211
sudo modprobe iwlwifi connector_log=0x1 # reload the driver with CSI logging enabled
# 注意此时wifi是没有密码的;执行完后自动连接上wifi

数据的生成

1
2
3
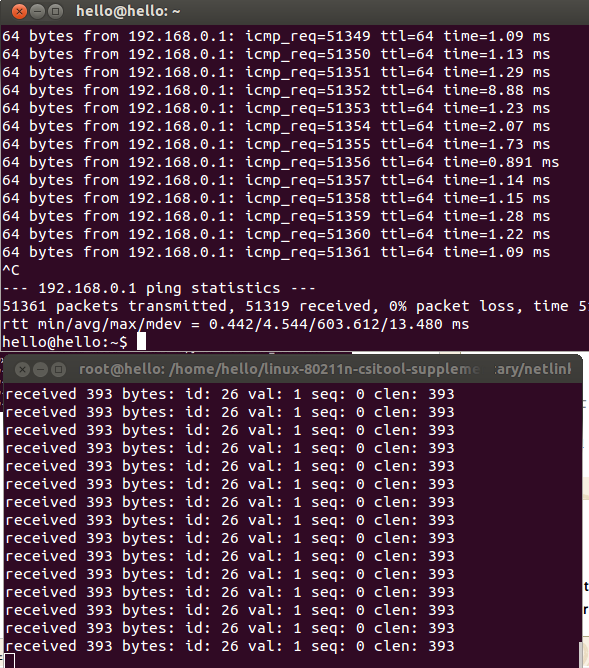
执行 sudo linux-80211n-csitool-supplementary/netlink/log_to_file csi.dat (xxx.dat可以自己命名)
# 若提示错误,请查看下文问题解决
再开启一个终端,ping 路由器ip地址,等待一会,便可以查看到csi.dat的文件大小发生变化,如下图所示

ping 路由器ip地址

avatar


文件大小发生改变

avatar


解决方案

1、git clone 慢

avatar

这里给出linux-csitool 的网盘链接 下载

2、数据的生成中出现权限不够,需要修改log_to_file文件的权限,如下图所示,是更改后的文件权限图

avatar


Matlab的安装

参考该文

破解文件


数据处理

参考官方链接


源码参考,CSI信道状态信息处理入门


源码参考,基于WIFI信号的呼吸和心率检测(论文总结)


需要linux-80211n-csitool-supplementary下的matlab文件 下载

如下图所示,把几个文件从ubuntu拷贝到windows系统下:


avatar

在同目录下,创建一个show_csi.m的文件,编写的代码如下图所示

数据测试下载


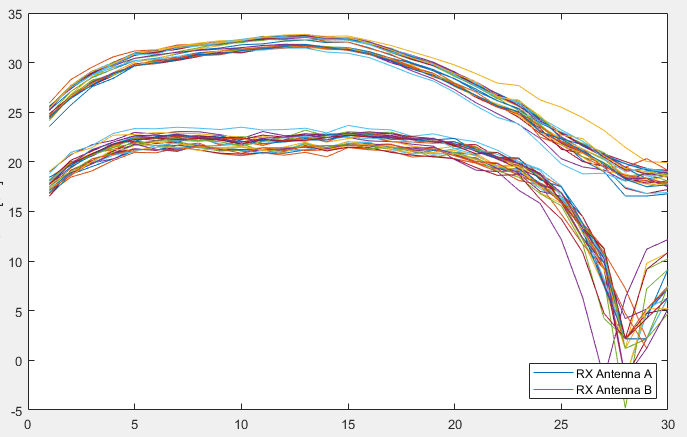
一组CSI数据的SNR(信噪比)

1
2
3
4
5
6
7
8
9
10
11
12
13
14
15
16
17
18
19
20
% 为了不出错,这里数据文件跟show_csi.m文件在同一个目录下面
csi_trace = read_bf_file('subcarrier_1snd.dat');%源数据为你用CSI Tools工具采集到的原始数据

for l=1:30 %取50个数据包的数据
csia=get_scaled_csi(csi_trace{l});
for i=1:1 %1个发射天线
for j=1:2 %2个接收天线
for k=1:30 %30个子载波数据
B(i,j,k)=csia(i,j,k);
end
end
end
plot(db(abs(squeeze(B).')))
hold on
end

legend('RX Antenna A', 'RX Antenna B', 'Location', 'SouthEast' );
xlabel('Subcarrier index');
ylabel('SNR [dB]')
hold off;

实验效果如下图所示


avatar


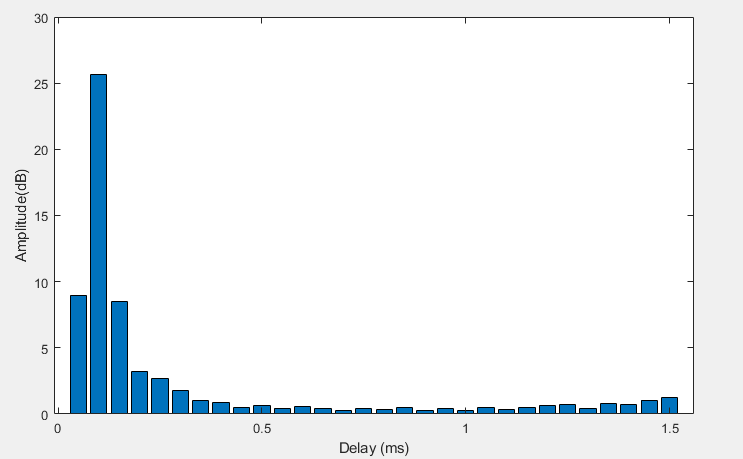
时域柱状图

1
2
3
4
5
6
7
8
9
10
11
12
13
14
15
16
17
18
19
csi_trace = read_bf_file('subcarrier_1snd.dat');
for l=1:50 %取50个数据包的数据
csia=get_scaled_csi(csi_trace{l});
for k=1:30 %30个子载波数据
B(1,1,k)=csia(1,1,k);
end
csi_one=squeeze(B).';

for ki=1:30 %30个子载波数据
csi_amp(ki,l)=csi_one(ki); %第l个数据包的第k个子载波的相位值 【子载波,数据包】
end
end
csi_ifft=ifft(csi_amp(:,1));
T_amp=abs(csi_ifft);
bar(T_amp);
set(gca,'XTick',[0 10 20 30]);
set(gca,'xticklabel',{'0','0.5','1','1.5'});
xlabel('Delay (ms)');
ylabel('Amplitude(dB)');

实验效果如下图所示

avatar


执行sample_data下的数据文件

1
2
3
4
5
6
7
8
9

csi_trace = read_bf_file('log.all_csi.6.7.6');
csi_entry=csi_trace{1}; %只取了一个包的数据
csi = get_scaled_csi(csi_entry); %将数据包中的CSI数据单独取出
subplot(1,2,1)
plot(db(abs(squeeze(csi).'))) %降维成30×3的矩阵
legend('RX Antenna A', 'RX Antenna B', 'RX Antenna C', 'Location', 'SouthEast' ); %因此此处的横坐标表示的子波索引,纵轴表示此数据包中,子波的幅度
xlabel('Subcarrier index');
ylabel('SNR [dB]');

实验效果如下图所示


avatar


说明

1、关于实验效果图的解释,将在以后的文章中给出

2、下一篇文章,将主要讲解官方处理的样例


几个不知名的同学

几个不知名的同学

3 posts
© 2019 几个不知名的同学
Powered by Hexo
|
Theme — NexT.Pisces v5.1.4
博客全站共2.1k字